So you have the powerful Motorola Droid with a great open source Android OS. Unfortunately the openness stops there. You are at the mercy of the carriers who ultimately decide what version you will run and when and if you will receive updates. If a device doesn’t allow access the bootloader and root without resorting to hacks it falls short of being a truly open device. This is the final hurdle which we as consumers must overcome. In this article I will cover the details of accessing the bootloader and rooting your Droid.
Heres a quick overview of the entire rooting process. At this time Android 2.1 for the Droid has not been rooted. Gaining root access requires you to first flash (install) your bootloader also known as the recovery partition. This recovery partition will then enable you to flash (install) the stock Android 2.1 ROM with root access.
Requirements:
– Motorola Droid running stock Android 2.1
– Windows (XP/Vista/7) to install the bootloader
– Motorola Droid USB drivers (32-bit download) (64-bit download)
– RSD Lite 4.6 (download)
– SPRecovery SBF (download)
– Stock Android 2.1 ROM w/root (download)
The rooting process has become simpler and much safer since the stock 2.1 ROM with root access has been released. There is still some risk involved when attempting this process, but the risk is very small and most problems can be resolved by re-flashing the ROM or recovery image. The process should take maybe 10 minutes. I encourage you to read the entire guide first before attempting any of these steps.
Backup your data
ROM images will normally replace boot and system directories but leave the SD card where your personal data is stored untouched. In any event I would still recommend being proactive and backing up your SD card as well as any other data that you couldn’t live without.
There are a couple other areas you might want to backup as well. Apps are usually stored on the system partition so they will be gone after you complete this guide. They can easily be downloaded once again after you install your new ROM, but if you have any special configurations or data associated with them, they should be backed up or exported. SMS and MMS messages will also be erased. On the bright side there are a couple apps which do a great job of backing up and restoring this data which are available in the Android Market.
Flash the SPRecovery bootloader onto your Droid
The default Android recovery image/bootloader allows only official updates signed by Google to be installed. Installing the a custom recovery image such as SPRecovery removes this restriction allowing you to install any custom OS that you see fit.
Please note that I have had trouble in the past attempting this step with a Windows guest on a VirtualBox Linux host. Flashing SPRecovery seems to consistently fail, because of this a non-virtualized Windows install is recommended.
1. Download the SPRecovery SBF file to your PC: SPRecovery_ESE81.sbf
2. Download the correct Motorola USB drivers and install to your PC. (32-bit download) (64-bit download)
To find the architecture for your copy of Windows go to Control Panel -> System.
3. Download and install RSD Lite 4.6. (download)
4. Turn off your Droid and connect it to your PC over USB.
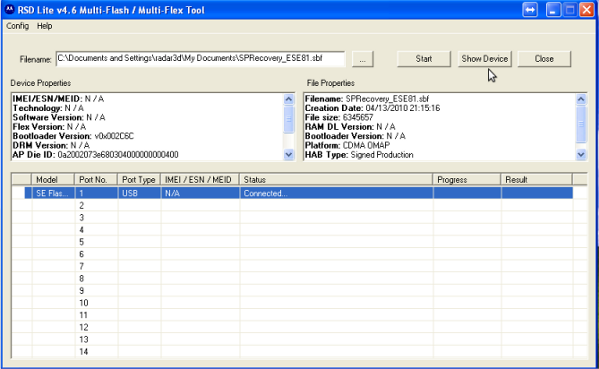
5. Open RSD Lite.
6. Slide open your keyboard, hold up on the d-pad and the power button for 5 seconds, then release both buttons.
Your Droid should be in a black bootloader screen.
7. In RSD Lite select the SPRecover_ESE81.sbf file.
8. Click “start” and allow the SPRecovery SBF to flash. This should not take long.
9. Allow for your phone to reboot and for RSD Lite to show that you are 100% and completed.
You now have SPRecovery installed on your Droid.
Install the stock Android 2.1 rooted ROM
You will now flashing/installing a 2.1 ROM with root access onto your device using SPRecovery. For these instructions, we have chosen a stock 2.1 rooted ROM, but you can go straight to a custom ROM that is compatible with SPRecovery.
1. Download this file to your PC: ESE81update.zipESE81update.zip
2. Rename the file to “update.zip”
3. Transfer update.zip to the root of your SD card over USB. (/sdcard/update.zip)
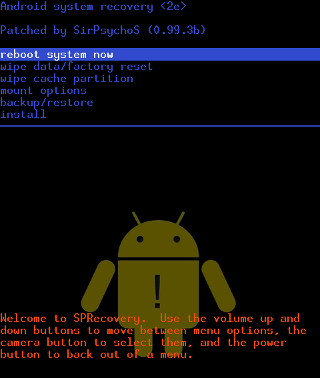
4. Reboot into SPRecovery. To do this power off your phone then hold the power and “x” button for 5 seconds, then release both buttons.
5. Using the volume up/down switch highlight “Wipe data/factory reset” and select with the camera button.
6. Select “Wipe cache partition.”
7. Select “Install.”
8. Select “Allow update.zip installation.”
9. Select “Install /sdcard/update.zip (deprecated).” The new ROM will be installed.
10. After this completes, select reboot.
You now have a Motorola Droid with a rooted 2.1 ROM installed! You will have to re-add your Google accounts and in some cases the Droid will dial Verizon to reactivate itself.
At this point you can choose to stay with the stock rooted Android 2.1 and reinstall all your apps. Or you can check out many of the custom ROMs such as the Cyanogenmod for Droid, which is my personal favorite.
FAQ
Can I revert back to stock Android 2.1?
Yes it can be done fairly easily, but I will save that guide for another day.
Is adb (Android Debug Bridge) or Android SDK still required to root?
No, this is no longer required however you can use that method to root as well. The new method is safer and faster and for most people less confusing.
Is there a quick way to see if I have root access?
Yes, if everything worked properly, you should see the Superuser Permissions app with the Ninja icon.
Will I have to repurchase the apps I have already paid for?
No, once you log into your market account you can download these once again free of charge.


